Monday, 17 January 2011

Inlay Appliqué – Preparing the Squares

I began the preparation work for chapter 10 back in September 2010 right before I had to pack up for revision and then relocation back to sunny Devon!  I decided to create a lot of felt squares to play with so found a handy white blanket and a pale blue blanket from Ikea (oh how I miss Belfast Ikea!) and got painting and stamping.
Image 1 - Painting and stamping on pieces of blanket: Making Squares 1
Image 2 – More painting and stamping:Making Squares 2
Image 3 – Close up of some stamping with a second stamped layer of silver ink:Making Squares 3
You can see where the colour has gradually bled from the stamped pattern.
Image 4 – Blanket painted yellow with gold and white acrylic stamping:Making Squares 4
Image 5 – Stamping yellow and silver onto painted blanket:Making Squares 5
When they were dry I cut them into approximately 4.5x4.5 inch squares.
Image 6 – A big pile of squares!Making Squares 6
I decided that I would create a few more ‘interesting’ squares and added layers with the help of bondaweb.
Image 7 – Blue square with scraps of fabric and chopped up silver cord sandwiched under blue netting:Making Squares 7
Image 8 – Plain yellow square with green organza on top:Making Squares 8
Image 9 – Yellow square with bits and bobs sandwiched under yellow netting:Making Squares 9
Image 10 – Yellow square with curious fabric I found in my stash (black net with silver glitter all over!):Making Squares 10
Image 11 – Blue square with blue organza on top:Making Squares 11
Image 12 – Printed blue square with beads and stars under blue organza:Making Squares 12
Image 13 – Yellow square with chopped up silver cord under yellow netting:Making Squares 13
Image 14 – I ended up with quite a stash of squares to play with!Making Squares 14

Saturday, 8 January 2011

Reverse Appliqué

I’ve been very lazy… I did the work for this chapter (chapter 9) back in August 2010 (!) and have only just put them online.  That’s just shocking…  I’ve done quite a lot of stitched work since for a project which involved some of the techniques I learnt with this chapter and now I review these initial samples I realise that I learnt a lot from doing them! 

So first off I did a simple traditional reverse appliqué sample:

Traditional Reverse Applique I wasn’t particularly sensible in my choice of fabric and the blue is stretchy.  I think it was once a top!  When I tried to stitch the edges of the blue I got quite a lot of puckering.  I felt frustrated trying to do the corners – I get little fraying right in the corner on even the neatest one.  As you can see there are some terrible edges really.  I didn’t really enjoy this process – I shall have to try again another time with some different fabrics.

Next up were samples that used the sewing machine and a bit of cutting.  The first sample shows the stitch work made on layers from inside out:

Inside Out

The next sample was worked outside in.  I realise that I shouldn’t have used a printed top fabric as it detracts entirely from the reverse appliqué!

Outside In

Outside In Close Up

Next up is slashed reverse appliqué:

Slashed

Looking back I could have used some really bright fabrics in the lower layers and they would have given a lovely contrast.

Slashed Close Up 3

Slashed Close Up 4

Finally here is my favourite sample which uses layers of different fabrics that have been cut away at each stage of stitching:

Multi-Coloured Slashed

I really like the sheer fabric with little gold blobs on it:

Multi Close Up 1

Multi Close Up 2

I used a mix of two of these samples when I came to create a piece for The Sketchbook Project 2011.  The article entry about it, one of my other blog, can be seen here.

But have a little sneaky peek:

Swirl Close up

 More swirls...

Monday, 26 July 2010

Complex Samples

Well I finally got on with chapter 8!  I bought a cheap sewing machine in NI so that I could get on with the C&G as whenever I get home I’m not in the mood to set up my machine there (any excuse to buy something fabulous!).  Let me show you my samples in order of their creation.

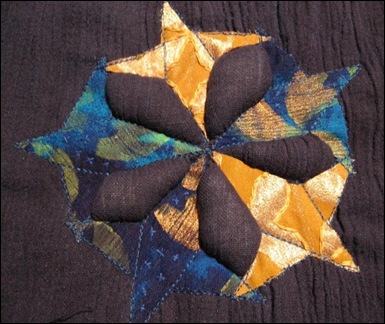
Sample 1:
IMG_0137

This has bonded shapes from two of the printed fabrics on top of a crinkly cotton.  The hand stitching is quite basic, with just little cross stitches on the blue stars and some chain outlining the stamped pattern on the gold fabric.

IMG_0141  IMG_0140IMG_0139Sample 2:

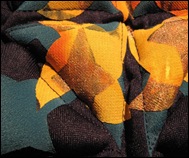
This sample is a semi-disaster.  The fabric I used for the background was entirely the wrong choice.  It’s very stretchy and whilst that made it easy to stuff it was a nightmare to sew onto the backing fabric.  Having said that, it does provide some interesting textures where the fabric is puckered.  The photograph isn’t very clear but there are four areas of padding: four corner triangles and four inner triangles.

IMG_0117

I didn’t hand embroider on this sample because, if I’m honest, I got the hump with it and wanted to move on!  Looking back, however, I really rather like it because it’s got more character than the other samples.
IMG_0166  IMG_0164

Sample 3:

IMG_0107

This sample is my favourite.  The pale lemon colour with the different shades of blue and the gold globules on the sheer bonded fabric work well together. 


IMG_0157

The rectangle in the centre and an outer ‘frame’ are both padded.  The outside edge is marked by running stitch in a metallic gold thread.  I played with my new sewing machine’s zigzag function for the first time.  This machine is so much better than the machine I have at home! 

IMG_0159copy  IMG_0158copy IMG_0160copyIMG_0162copy  Sample 4:

I decided it was time to change the colour scheme so that orange/yellow/gold is more dominant than the blue.  For this and the following two samples I used a square of blue polyester lining material, a square of yellow hand printed cotton and a square of sheer material with gold star on it.  I ironed Bondaweb onto their reverse sides and cut out shapes like in an earlier chapter.  I then mixed and matched them.  I rather like this first sample, although the orange is quite overpowering.

  IMG_0144copy

I added French knots on the blue ‘L’s to add some texture.

Sample 5:

This sample has four, how do I describe them? Er, the four pointy corners (?!) are padded!  The centre is flat with French knots within and on the border.

IMG_0130copy

Sample 6:

For this sample, I bonded the pieces to the orange background (which is an old curtain by the way - imagine having curtains that are this colour?!) and machine stitched the four-pointed star from the edge of the blue inwards.  Then I attached this to the bottom layer by machining slightly inside the blue fabric.  This gave the padded star a narrow blue ‘border’.  After I had padded the star and stitched up the back I thought “duh, why didn’t I embroider the inner star?!”.  But alas it was too late.

IMG_0156copyIMG_0154copy

Sample 7:

By the time sample seven arrived (which I now realise I didn’t need to do…) I was a bit weary.  But here it is anyway. 

IMG_0134

It’s incredibly dull.  The shapes are alternately padded and reminds me of a mattress!  I had clearly run out of steam by this point and so I packed up and had a cup of tea instead.

Saturday, 24 July 2010

A brief pause....

Well I know it's been a while but I'm getting back to the C&G work!  Huzzah!  I've gotten a new lease of creativity recently and yesterday I was terribly naughty and bought a sewing machine.  That, in itself, isn't naughty but I've already got a sewing machine.... the problem is it's in England and I'm in Northern Ireland this weekend and, well, I want to crack on!  Everytime I go home I don't seem to 'have the urge' to do any machine stitching.  So I thought "stuff it" and went a bought a cheap(ish) machine.  To my suprise I think it might be better than the one I already own!  Well anyway, I can't wait to get using it - and finally I'll be able to get cracking on Chapter 8 (which I have started, honest!).

Sunday, 18 April 2010

Layered and Cut


I had a pause between chapter 6 and chapter 7 but finally got re-started again recently. This chapter requires 6 samples but I must be honest and confess to only creating 5... I guess I just want to crack on to the next chapter really! I enjoyed the technique but feel like I restricted myself a little - I look at my samples and all I can think is "too many neat edges!". So it's not suprising that my favourite sample is rather frayed. Anyway, let me show you my samples in order of creation:

Sample 1


This was my first attempt and is pretty basic on the layering.  I've mainly used chain stitch.  The scan doesn't show the gold pattern on the greenish fabric in the center.  Overall I feel that this sample is pretty dull to be honest.  I moved swiftly on.


Sample 2


This sample is slightly more interesting.  I used chain stitch (again!) and embroidery threads (2 strands).    The blue fabric is nylon and frays very easily.  It seems much more pleasing to the eye than sample 1.


Sample 3


This sample uses nylon dress-lining and netting on cotton.  Much of the stitiching is elongated cross stitch in yellow.  I think that the contrast of the netting against the strong blue is interesting but I don't much like the sample.  I think it's boring.


Sample 4


This is my favourite sample but unfortunately the image doesn't do it much justice.  The top layer is chiffon (I think) which alters between blue and purple.  Underneath that is a layer of some kind of craft paper/material with gold stars on it.  This is all sewn to a background of blue cotton.  The stitches on the sample are running stitch (by hand).  The top layer is cut away with the edges remaining frayed to give some interesting texture. 


Sample 5


The final sample is the only one with machine stitching on it.  Unfortunately I've only got a rubbish mini-sewing machine in Belfast (my decent machine is back in England!) but I had a bash anyway.  The only stitch on the machine is running stitch!  And you can't free-embroider with it either so I was pretty limited in my choice of stitch!  Again the image doesn't do the front justice - in real-life it is far prettier!!!

I've just realised that haven't twisted shapes around in any of my samples, they're all still symmetrical!  How utterly dull!  I tried in sample 2 because the first shape-layer isn't straight on the fabric... but then I clearly forgot what I was doing and then lined the second shape with the first!